
Taking high-quality photos of your crafts is essential to attract customers and boost online sales. Good photography highlights the details, quality, and charm of handmade items, showcasing professionalism and building trust. Here’s a complete guide to help you capture stunning images of your crafts.
Why High-Quality Photos Matter
- First Impressions: Eye-catching photos grab the attention of potential customers.
- Showcase Details: Highlight the texture, colors, and craftsmanship of your products.
- Build Trust: Professional images convey credibility and professionalism.
- Increase Sales: Clear and appealing photos encourage customers to make a purchase.
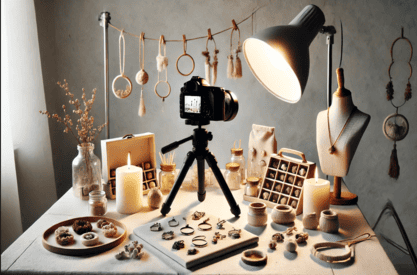
Step 1: Set Up a Proper Workspace
- Choose a Bright Location: Use natural light near a window to enhance your photos.
- Use a Clean Background: Opt for a neutral backdrop like white or light gray to keep the focus on your product.
- Eliminate Clutter: Ensure your workspace is tidy to avoid distractions in the frame.
Step 2: Gather the Right Equipment
- Camera: Use a DSLR, mirrorless camera, or a smartphone with a good-quality camera.
- Tripod: Stabilize your camera to avoid blurry shots and maintain consistency.
- Lighting: Invest in softbox lights or use reflectors to balance shadows in low-light conditions.
- Props: Add simple props to complement the product and showcase its use.
Step 3: Focus on Lighting
- Natural Light: Photograph during the day when sunlight is soft, preferably in the morning or late afternoon.
- Avoid Harsh Shadows: Diffuse sunlight with sheer curtains or a light diffuser.
- Consistent Lighting: Ensure all photos have a similar brightness for a cohesive look.
Step 4: Arrange Your Product
- Highlight Key Features: Position the product to showcase its best angles.
- Show Scale: Include objects like a ruler or hand to demonstrate size.
- Create Context: Display the product in use, such as a necklace worn or a candle lit.
Step 5: Take Multiple Shots
- Variety of Angles: Capture front, back, and side views, as well as close-ups of details.
- Lifestyle Shots: Show the product in a real-life setting to help customers visualize its use.
- Overhead Shots: Take top-down photos for flat-lay arrangements.
Step 6: Edit Your Photos
- Adjust Brightness and Contrast: Use photo editing software like Adobe Lightroom or Canva to enhance colors and clarity.
- Crop and Straighten: Remove unnecessary elements and align the image for a clean composition.
- Keep It Real: Avoid over-editing; ensure the product looks true to life.
Step 7: Optimize for Online Platforms
- Resize Images: Adjust dimensions to fit e-commerce or social media requirements.
- Compress Files: Reduce file size without losing quality to improve website loading speed.
- Add Watermarks: Protect your photos by adding a subtle watermark with your logo.
Tips for Success
- Invest in Practice: Experiment with different setups, lighting, and angles to improve your skills.
- Stay Consistent: Use a consistent style for all product photos to enhance your brand identity.
- Test Your Photos: Review how your images look on various devices before uploading them.
Conclusion: Showcase Your Crafts Beautifully
High-quality photos are a powerful tool to showcase your craftsmanship and attract customers online. By following these steps, you can create professional images that highlight the beauty and uniqueness of your handmade products, helping your craft business thrive.